Linux
What is DKIM Records?

Introduction
DKIM (DomainKeys Identified Mail) is an email authentication method designed to detect email spoofing. It allows the receiver to verify that an email was indeed sent and authorized by the domain owner. This is done by adding a digital signature to the email headers.
How DKIM Works
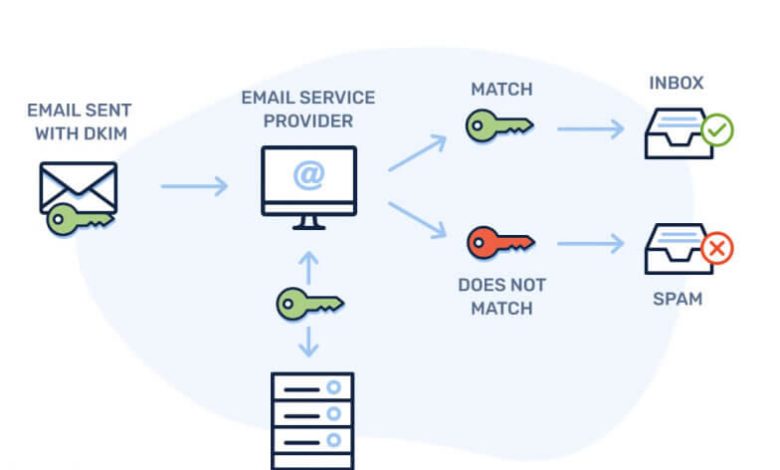
DKIM works by using cryptographic signatures. Here’s how the process generally works:
- Key Generation: The domain owner generates a pair of cryptographic keys – a private key stored securely on the sending server and a public key published in the domain’s DNS records.
- Email Signing: When an email is sent, the sending server signs the email with its private key. The signature is embedded in the email header.
- Public Key Verification: The recipient server retrieves the public key from the sender’s DNS records and uses it to verify the signature.
- Validation Outcome: If the signature is valid, the email is considered authentic and untampered.
Structure of a DKIM Record
A DKIM record is a DNS TXT record containing a public key and other components. It typically looks like this:
type: TXT
host: selector._domainkey.example.com
value: v=DKIM1; k=rsa; p=public_key_here
Key elements include:
- v=DKIM1: Specifies the DKIM version.
- k=rsa: Indicates the encryption algorithm used.
- p=: The public key for signature verification.
Benefits of DKIM
- Enhanced Email Security: Helps prevent email spoofing and phishing attacks.
- Improved Email Deliverability: Authenticated emails are less likely to be marked as spam.
- Protection of Brand Reputation: Prevents unauthorized use of the domain.
Setting Up DKIM
- Generate DKIM Keys: Use a tool to generate a public and private key pair.
- Publish the Public Key: Add a TXT record in your DNS with the public key.
- Configure Your Email Server: Ensure your mail server is configured to sign outgoing emails with the private key.
- Test Your Configuration: Use tools to verify the DKIM setup.
DKIM vs. SPF vs. DMARC
- SPF (Sender Policy Framework): Specifies authorized mail servers for a domain.
- DMARC (Domain-based Message Authentication, Reporting & Conformance): Uses SPF and DKIM results to determine email authenticity and provides reporting.
How to Install DKIM on Ubuntu Server
- Install OpenDKIM:
sudo apt update sudo apt install opendkim opendkim-tools - Generate DKIM Keys:
sudo opendkim-genkey -t -s mail -d example.com sudo mkdir -p /etc/opendkim/keys/example.com sudo mv mail.private /etc/opendkim/keys/example.com/ sudo mv mail.txt /etc/opendkim/keys/example.com/ - Configure OpenDKIM: Edit
/etc/opendkim.confto include:Domain example.com KeyFile /etc/opendkim/keys/example.com/mail.private Selector mail - Update Postfix Configuration:
sudo nano /etc/postfix/main.cfAdd:
milter_protocol = 2 milter_default_action = accept smtpd_milters = inet:127.0.0.1:8891 non_smtpd_milters = inet:127.0.0.1:8891 - Restart Services:
sudo systemctl restart opendkim postfix - Publish the DKIM Record in DNS: Add the content from
mail.txtto your DNS.
DKIM vs. SPF vs. DMARC
- SPF (Sender Policy Framework): Specifies authorized mail servers for a domain.
- DMARC (Domain-based Message Authentication, Reporting & Conformance): Uses SPF and DKIM results to determine email authenticity and provides reporting.
Conclusion
DKIM is a critical component for email authentication, ensuring the security and trustworthiness of email communication. Implementing DKIM alongside SPF and DMARC provides robust protection against email threats and enhances your domain’s email reputation.


