The tar command is a powerful tool in Linux and Unix-based systems for archiving and compressing files. It allows users to create, extract, and manage compressed archives efficiently. This guide explains how to use the tar command to create compressed archives step by step.
1. What is the tar Command?
tar (short for Tape Archive) is used to archive files and directories. While it originally lacked built-in compression, modern tar implementations work seamlessly with compression tools like gzip and bzip2.
Basic Syntax:
tar [options] [archive-file] [file/directory-to-archive]2. Installing tar
Most Linux distributions come with tar pre-installed. To check if it’s installed:
tar --versionIf it’s not installed, use the following commands to install it:
- Ubuntu/Debian:
sudo apt update && sudo apt install tar -y - CentOS/RHEL:
sudo yum install tar -y - Fedora:
sudo dnf install tar -y
3. Creating a Basic Archive
To create an uncompressed tar archive:
tar -cvf archive.tar file1 file2 directory/Options Used:
-c: Create an archive.-v: Verbose mode (shows progress).-f: Specifies the archive file name.
Example:
tar -cvf backup.tar /home/user/documentsThis creates an archive named backup.tar containing the /home/user/documents directory.
4. Adding Compression
tar supports multiple compression formats. Below are the most commonly used ones:
4.1 gzip Compression
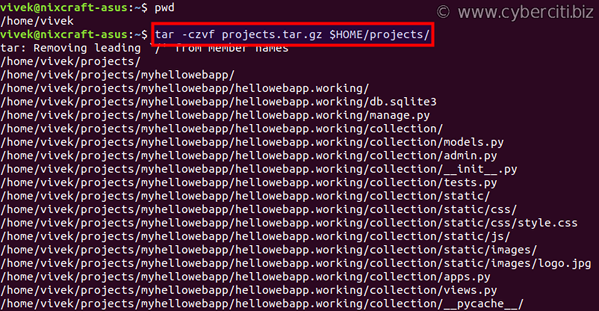
To create a gzip-compressed tar archive:
tar -czvf archive.tar.gz file1 file2 directory/-z: Enables gzip compression.
Example:
tar -czvf backup.tar.gz /home/user/documentsThis creates a gzip-compressed archive named backup.tar.gz.
4.2 bzip2 Compression
To create a bzip2-compressed tar archive:
tar -cjvf archive.tar.bz2 file1 file2 directory/-j: Enables bzip2 compression.
Example:
tar -cjvf backup.tar.bz2 /home/user/documentsThis creates a bzip2-compressed archive named backup.tar.bz2.
4.3 xz Compression
To create an xz-compressed tar archive:
tar -cJvf archive.tar.xz file1 file2 directory/-J: Enables xz compression.
Example:
tar -cJvf backup.tar.xz /home/user/documentsThis creates an xz-compressed archive named backup.tar.xz.
5. Extracting Archives
To extract files from a tar archive:
Extract Without Compression
tar -xvf archive.tarExtract gzip-compressed Archives
tar -xzvf archive.tar.gzExtract bzip2-compressed Archives
tar -xjvf archive.tar.bz2Extract xz-compressed Archives
tar -xJvf archive.tar.xz6. Commonly Used Options
View Contents of an Archive
To list files in an archive without extracting:
tar -tvf archive.tarExclude Specific Files
To exclude specific files or directories:
tar --exclude='file-to-exclude' -czvf archive.tar.gz directory/Preserve File Permissions
To preserve file permissions and ownership:
tar -czvpf archive.tar.gz directory/7. Best Practices
- Use Meaningful Names: Include dates or descriptions in archive names for clarity.
tar -czvf project_backup_20250121.tar.gz project/ - Test Archives: Ensure your archive works before deleting original files:
tar -tvf archive.tar.gz - Automate Backups: Use cron jobs to automate archiving tasks. Example cron job:
0 2 * * * tar -czvf /backup/daily_backup.tar.gz /data
8. Conclusion
The tar command is a versatile and efficient tool for creating and managing compressed archives in Linux. By understanding the options and best practices outlined in this guide, you can effectively use tar for various backup and archival tasks.