How to Install and Use VSCode on Linux

How to Install and Use VSCode on Linux
Visual Studio Code (VSCode) has become one of the most popular code editors among developers worldwide. Its flexibility, extensive extensions, and user-friendly interface make it an excellent choice for programming in various languages. This article will guide you through the installation and usage of VSCode on Linux, ensuring you have all the necessary information to get started.
Why Choose VSCode?
Before diving into the installation process, let’s briefly discuss why VSCode is favored by many developers:
Cross-Platform Compatibility: VSCode runs smoothly on Windows, macOS, and Linux, allowing you to use the same development environment across different systems.
Extensive Extension Marketplace: With thousands of extensions available, you can customize VSCode to suit your specific needs, whether you are working on Python, JavaScript, or any other language.
Integrated Terminal: VSCode includes an integrated terminal, enabling you to run commands without leaving the editor.
Smart Code Completion: Its IntelliSense feature provides smart code suggestions and completions, speeding up your coding process.
Built-in Git Support: VSCode seamlessly integrates with Git, making version control straightforward and efficient.
Installing VSCode on Linux
Step 1: Update Your System
Before installing any new software, it’s always a good idea to update your package lists to ensure you have the latest versions. Open a terminal and run the following command:
sudo apt update
sudo apt upgrade
Step 2: Downloading the VSCode Package
You can install VSCode using the official .deb package from Microsoft or via Snap or Flatpak. Below are the methods for each.
Method 1: Installing via .deb Package
Download the Package: Visit the official VSCode download page and download the .deb package suitable for your Linux distribution.
Install the Package: Once the download is complete, navigate to your Downloads folder and install the package using the following command:
cd ~/Downloads
sudo dpkg -i code*.deb
Fix Dependencies: If there are any dependency issues, run the following command:
sudo apt install -f
Method 2: Installing via Snap
If you prefer using Snap, you can install VSCode with a single command. Snap is pre-installed on many Linux distributions. To install VSCode, run:
sudo snap install code –classic
Method 3: Installing via Flatpak
For users who prefer Flatpak, ensure that Flatpak is installed on your system. Then, run:
flatpak install flathub com.microsoft.VSCode
Step 3: Launching VSCode
Once the installation is complete, you can launch VSCode by searching for it in your application menu or by running the following command in the terminal:
code
Configuring VSCode for Your Needs
After launching VSCode for the first time, you may want to customize it according to your workflow:
Installing Extensions
To enhance your coding experience, install extensions that are relevant to your projects. To do this:
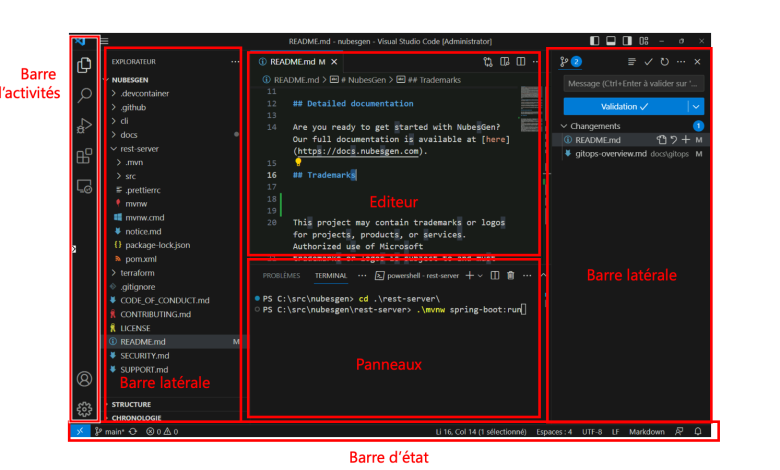
Click on the Extensions view icon in the Activity Bar on the side of the window or press Ctrl+Shift+X.
Search for the extensions you need, such as Python, JavaScript, or HTML, and click “Install”.
Customizing Settings
VSCode allows you to tweak various settings to better fit your workflow. To access settings:
Click on the gear icon in the lower left corner of the window and select “Settings”.
You can search for specific settings or browse through categories to find what you need.
Using the Integrated Terminal
One of the standout features of VSCode is its integrated terminal. To open the terminal, you can either:
Go to View > Terminal or use the shortcut `Ctrl+“ (backtick).
This terminal allows you to run command-line operations without leaving the editor, making your workflow much more efficient.
Best Practices for Using VSCode
Use Version Control: Make sure to leverage the built-in Git features to manage your code effectively. Commit changes regularly and use branches for new features or fixes.
Take Advantage of Shortcuts: Familiarize yourself with keyboard shortcuts to navigate and execute commands quickly.
Utilize Workspace Features: Organize your projects using workspaces. You can save your workspace settings and open specific folders with all your preferences intact.
Explore Themes and Icons: Customize the appearance of your editor by exploring different themes and icon sets available in the Extensions marketplace.


