How to Install and Use Nginx as a Load Balancer

How to Install and Use Nginx as a Load Balancer
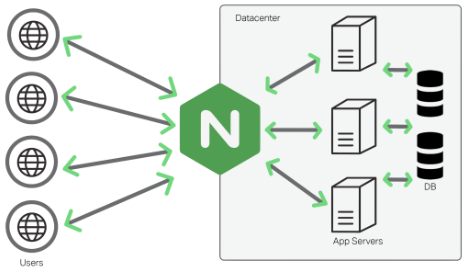
Load balancing is a critical technique used to distribute network traffic across multiple servers. By doing so, it enhances the performance, reliability, and scalability of applications. Nginx, a popular open-source web server, can also function effectively as a load balancer. In this guide, we will explore how to install and configure Nginx as a load balancer, ensuring a robust and efficient setup for your web applications.
Why Use Nginx for Load Balancing?
Nginx is known for its high performance, stability, and low resource consumption. Its asynchronous architecture allows it to handle many connections simultaneously, making it ideal for load balancing. By using Nginx, you can achieve:
- Increased Availability: Nginx can route traffic away from failed servers, ensuring your application remains accessible.
- Improved Performance: By distributing requests across multiple servers, Nginx reduces the load on any single server, leading to faster response times.
- Scalability: You can easily add or remove servers from your load-balanced setup without significant downtime.
Prerequisites
Before you begin, ensure you have:
- A server running a Linux-based operating system (Ubuntu, CentOS, etc.).
- Root or sudo access to install software.
- Nginx installed on your server. If you haven’t installed it yet, follow these steps:
- Installing Nginx
- For Ubuntu, you can install Nginx using the following commands:
sudo apt update
sudo apt install nginx
For CentOS, use:
sudo yum install epel-release
sudo yum install nginx
Once installed, start Nginx:
sudo systemctl start nginx
sudo systemctl enable nginx
Basic Load Balancer Configuration
Nginx can load balance HTTP, TCP, and UDP traffic. Here, we’ll focus on HTTP load balancing, which is the most common use case. Follow these steps to configure Nginx as a load balancer.
Step 1: Define Upstream Servers
Create an upstream block in the Nginx configuration file to define your backend servers. Open the configuration file located at /etc/nginx/nginx.conf (or /etc/nginx/sites-available/default on Ubuntu) and add the following block:
http {
upstream backend {
server backend1.example.com; # Replace with your backend server IP or hostname
server backend2.example.com; # Replace with your backend server IP or hostname
server backend3.example.com; # Replace with your backend server IP or hostname
}# Other configurations…
}Replace backend1.example.com, backend2.example.com, and backend3.example.com with the actual IP addresses or hostnames of your backend servers.
Step 2: Configure the Load Balancer
Next, you need to set up the server block to handle incoming traffic. Below the upstream block, add a server block:
server {
listen 80; # Port for incoming requests
server_name example.com; # Replace with your domain or IPlocation / {
proxy_pass http://backend; # Forward requests to the backend
proxy_set_header Host $host;
proxy_set_header X-Real-IP $remote_addr;
proxy_set_header X-Forwarded-For $proxy_add_x_forwarded_for;
proxy_set_header X-Forwarded-Proto $scheme;
}
}
This configuration listens on port 80 and forwards requests to the defined backend servers. The proxy_set_header directives ensure that the original request headers are preserved.
Step 3: Test the Configuration
After making these changes, it’s essential to test the Nginx configuration for syntax errors:
sudo nginx -t
If the test is successful, reload Nginx to apply the changes:
sudo systemctl reload nginx
Step 4: Load Balancing Methods
Nginx supports various load balancing methods. The default is round-robin, but you can choose others such as:
- Least Connections: Sends requests to the server with the least active connections.
- IP Hash: Distributes requests based on the client’s IP address, ensuring that a client always reaches the same server.
To set a different load balancing method, modify the upstream block. For example, to use least connections:
upstream backend {
least_conn;
server backend1.example.com;
server backend2.example.com;
server backend3.example.com;
}
Monitoring and Logging
To effectively manage your load balancer, monitoring is crucial. Nginx provides access and error logs by default. You can find these logs in /var/log/nginx/access.log and /var/log/nginx/error.log. Analyzing these logs will help you understand traffic patterns and troubleshoot any issues.


