How to Install and Use iSCSI Initiator on Ubuntu

How to Install and Use iSCSI Initiator on Ubuntu
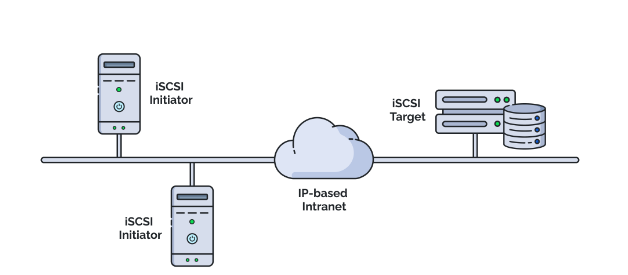
The iSCSI (Internet Small Computer System Interface) protocol allows for data transfer over IP networks, enabling systems to access and manage storage devices remotely. iSCSI initiators are clients that connect to iSCSI targets, which are the remote storage devices. By configuring an iSCSI initiator on Ubuntu, you can treat network-based storage as though it’s directly attached to your machine. This guide will walk you through the process of installing and configuring the iSCSI initiator on Ubuntu, ensuring a seamless connection to your iSCSI targets.
Prerequisites
Before we begin, ensure you have the following:
- Ubuntu Server: This guide assumes you are using Ubuntu 20.04 or later.
- Access to iSCSI Target: You need the IP address or hostname of an iSCSI target that you want to connect to.
- Root or Sudo Access: The installation and configuration steps require administrative privileges.
Step 1: Install Open-iSCSI Initiator
Open-iSCSI is the most commonly used iSCSI initiator software on Linux. Start by updating your system and installing the Open-iSCSI package.
Update the package index:
sudo apt update
Then, install Open-iSCSI:
sudo apt install open-iscsi -y
After the installation, the Open-iSCSI service should start automatically. You can verify this with:
sudo systemctl status iscsid
You should see output indicating that the iscsid service is running.
Step 2: Discover iSCSI Targets
Before you can connect to an iSCSI target, you must discover the available targets on the remote server. To do this, use the iscsiadm command along with the IP address of the iSCSI target server.
Run the following command, replacing TARGET-IP with the actual IP address of your iSCSI target:
sudo iscsiadm -m discovery -t sendtargets -p TARGET-IP
This command queries the specified target server and returns a list of available iSCSI targets. The output will look something like this:
TARGET-IP:3260,1 iqn.2023-01.com.example:storage.target1
Make note of the IQN (iSCSI Qualified Name), as you will need it to establish the connection.
Step 3: Log in to the iSCSI Target
Once you’ve discovered the available iSCSI targets, you can log in to a specific target using the IQN. This step initiates a session between your iSCSI initiator and the remote target.
Run the following command to log in:
sudo iscsiadm -m node -T iqn.2023-01.com.example:storage.target1 -p TARGET-IP –login
You should see confirmation that the login was successful, and the iSCSI session is now active. To verify the connection, you can use:
sudo iscsiadm -m session
This command displays active iSCSI sessions. You should see your target listed, confirming that the connection has been established.
Step 4: Verify the iSCSI Disk
Once logged in, the storage from the iSCSI target will be presented as a new block device on your Ubuntu system. To find the new disk, you can use the lsblk command:
lsblk
The new iSCSI disk will typically appear as /dev/sdb, /dev/sdc, or similar, depending on your existing devices. You can also verify the device by checking the system logs:
dmesg | grep iSCSI
Step 5: Partition and Format the iSCSI Disk
If the iSCSI disk is new and unformatted, you’ll need to partition and format it before you can use it. For this guide, we’ll assume that the new disk is /dev/sdb.
Create a new partition using the fdisk tool:
sudo fdisk /dev/sdb
Inside the fdisk utility:
- Press n to create a new partition.
- Press p for a primary partition.
- Accept the default values to use the entire disk.
Once the partition is created, format it using a file system of your choice (e.g., ext4):
sudo mkfs.ext4 /dev/sdb1
Step 6: Mount the iSCSI Disk
Now that the iSCSI disk is formatted, you can mount it to a directory on your system. First, create a mount point:
sudo mkdir /mnt/iscsi
Next, mount the new partition to this directory:
sudo mount /dev/sdb1 /mnt/iscsi
Verify that the disk is mounted properly using the df -h command:
df -h
You should see the iSCSI disk listed, showing that it is mounted at /mnt/iscsi.
Step 7: Automatically Mount the iSCSI Disk on Boot
To ensure that the iSCSI disk is mounted automatically upon system reboot, you can add an entry to the /etc/fstab file. First, find the UUID of the iSCSI disk using the blkid command:
sudo blkid /dev/sdb1
Copy the UUID from the output. Then, edit the /etc/fstab file:
sudo nano /etc/fstab
Add the following line, replacing UUID with the actual UUID of your iSCSI partition:
UUID=your-uuid-here /mnt/iscsi ext4 defaults,_netdev 0 0
The _netdev option ensures that the iSCSI disk will only be mounted after the network is available, which is essential for network-based storage devices.
Step 8: Log Out and Disconnect from the iSCSI Target
If you no longer need access to the iSCSI target, you can log out and disconnect from it by running the following command:
sudo iscsiadm -m node -T iqn.2023-01.com.example:storage.target1 -p TARGET-IP –logout
This command terminates the session with the iSCSI target, and the storage device will no longer be available.
Thank you for visiting our page! If you’d like to delve into more articles about Linux systems and MinIO, please feel free to explore the links below.
How to Install and Configure MinIO on Ubuntu
Additionally, by renting a server from our site, you can perform your tests without restrictions in a dependable and effective environment, helping you to improve your skills at a faster pace. Well done! 🙂


