User management is a fundamental aspect of system administration in Unix-like operating systems such as Linux. The adduser command is a user-friendly utility that simplifies the process of creating and managing user accounts. It is often preferred over the more basic useradd command because it provides an interactive interface and automates many of the steps involved in user creation, such as setting up home directories and assigning default configurations.
This guide will provide a detailed explanation of how to use the adduser command for user management, covering all the technical details and advanced options.
Table of Contents
- Introduction to the
adduserCommand - Basic Syntax of the
adduserCommand - Creating a New User
- Setting a Password for the New User
- Creating a User with a Specific Home Directory
- Assigning a User to a Specific Group
- Creating a System User
- Customizing User Configuration
- Deleting a User
- Modifying an Existing User
- Advanced Options and Use Cases
- Conclusion
1. Introduction to the adduser Command
The adduser command is a high-level utility designed to simplify the process of adding and managing users on a Linux system. It is a Perl script that interacts with lower-level tools like useradd, usermod, and groupadd to automate tasks such as:
- Creating a home directory for the user.
- Setting up default configuration files (e.g.,
.bashrc,.profile). - Assigning the user to a primary group.
- Prompting for additional information, such as the user’s full name and password.
The adduser command is available on Debian-based distributions (e.g., Ubuntu) and some other Linux distributions. If it is not installed, you can install it using your package manager:
sudo apt install adduser
2. Basic Syntax of the adduser Command
The basic syntax of the adduser command is as follows:
adduser [options] username
username: The name of the user to be created or modified.options: Optional flags to customize the behavior of the command.
3. Creating a New User
To create a new user, simply run the adduser command followed by the desired username. For example, to create a user named john:
sudo adduser john
The command will prompt you for additional information, such as:
- Password: Enter a secure password for the user.
- Full Name: Enter the user’s full name (optional).
- Room Number, Work Phone, Home Phone, Other: These fields are optional and can be left blank.
Once the process is complete, the user will be created with a home directory (/home/john), a primary group named after the user (john), and default configuration files.
4. Setting a Password for the New User
During the user creation process, adduser will prompt you to set a password. If you want to change the password later, you can use the passwd command:
sudo passwd john
This command will prompt you to enter a new password for the user.
5. Creating a User with a Specific Home Directory
By default, adduser creates a home directory for the user under /home/username. If you want to specify a different home directory, use the --home option:
sudo adduser --home /custom/path/john john
This will create the user john with the home directory /custom/path/john.
6. Assigning a User to a Specific Group
By default, adduser creates a primary group with the same name as the user. You can also assign the user to additional groups using the --ingroup or --add-group options.
- Assigning a Primary Group:
To assign the user to an existing primary group, use the
--ingroupoption:sudo adduser --ingroup developers john
This will create the user
johnand assign them to thedevelopersgroup as their primary group. - Adding the User to Supplementary Groups:
To add the user to additional groups, use the
--add-groupoption:sudo adduser john --add-group sudo
This will add the user
johnto thesudogroup, granting them administrative privileges.
7. Creating a System User
System users are typically used for running services and daemons. They do not have a home directory or a login shell by default. To create a system user, use the --system option:
sudo adduser --system serviceuser
This will create a system user named serviceuser without a home directory.
8. Customizing User Configuration
The adduser command allows you to customize various aspects of user creation using additional options:
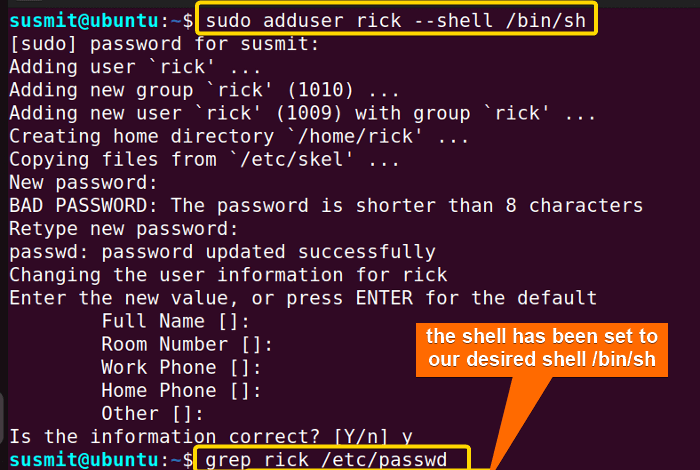
- Setting the User’s Shell:
To specify a custom login shell for the user, use the
--shelloption:sudo adduser --shell /bin/zsh john
- Setting the User’s UID:
To assign a specific user ID (UID), use the
--uidoption:sudo adduser --uid 1005 john
- Disabling Home Directory Creation:
To create a user without a home directory, use the
--no-create-homeoption:sudo adduser --no-create-home john
9. Deleting a User
To delete a user, use the deluser command:
sudo deluser john
By default, this command does not remove the user’s home directory. To delete the home directory as well, use the --remove-home option:
sudo deluser --remove-home john
10. Modifying an Existing User
To modify an existing user, use the usermod command. For example, to change the user’s login name:
sudo usermod -l newname john
To change the user’s home directory:
sudo usermod -d /new/home/dir -m newname
The -m option moves the contents of the old home directory to the new location.
11. Advanced Options and Use Cases
Creating a User with a Skeleton Directory
The adduser command uses a skeleton directory (/etc/skel) to populate the new user’s home directory with default configuration files. You can specify a custom skeleton directory using the --skel option:
sudo adduser --skel /custom/skel john
Setting an Expiration Date for the User
To set an expiration date for the user account, use the --expiredate option:
sudo adduser --expiredate 2023-12-31 john
The account will be automatically disabled after the specified date.
Creating a User with a Specific GID
To assign a specific group ID (GID) to the user’s primary group, use the --gid option:
sudo adduser --gid 1005 john
12. Conclusion
The adduser command is a powerful and user-friendly tool for managing user accounts on Linux systems. It simplifies the process of creating, modifying, and deleting users while providing a wide range of options for customization. Whether you’re a system administrator or a casual user, mastering the adduser command will help you efficiently manage users and maintain system security.
By following this guide, you should now have a solid understanding of how to use the adduser command for various user management tasks. Always remember to exercise caution when modifying or deleting user accounts, as these actions can have significant consequences for system security and functionality.
Happy user management!