Git is a distributed version control system that allows developers to track changes in their code, collaborate with others, and manage projects efficiently. Whether you’re working on a small personal project or a large team-based application, Git is an essential tool for modern software development. This guide will walk you through the process of installing Git, setting it up, and using it for version control.
Table of Contents
- Introduction to Git
- Installing Git
- On Linux
- On macOS
- On Windows
- Configuring Git
- Setting Up Your Identity
- Configuring Default Text Editor
- Setting Up Line Ending Preferences
- Basic Git Workflow
- Initializing a Repository
- Tracking Changes
- Committing Changes
- Viewing the Commit History
- Working with Remote Repositories
- Cloning a Repository
- Adding a Remote Repository
- Pushing and Pulling Changes
- Branching and Merging
- Creating and Switching Branches
- Merging Branches
- Resolving Merge Conflicts
- Advanced Git Features
- Stashing Changes
- Tagging Releases
- Using Git Hooks
- Best Practices for Using Git
- Conclusion
1. Introduction to Git
Git is a distributed version control system created by Linus Torvalds in 2005. It allows multiple developers to work on a project simultaneously without overwriting each other’s changes. Key features of Git include:
- Version Control: Track changes to files over time.
- Branching and Merging: Create separate branches for features or bug fixes and merge them back into the main codebase.
- Collaboration: Share code with others via remote repositories (e.g., GitHub, GitLab).
- Backup and Restore: Maintain a complete history of changes, allowing you to revert to previous versions if needed.
2. Installing Git
On Linux
To install Git on a Linux-based system, use your package manager:
- Debian/Ubuntu:
sudo apt update
sudo apt install git
- Fedora:
sudo dnf install git
- Arch Linux:
sudo pacman -S git
Verify the installation:
git --version
On macOS
Git is preinstalled on macOS, but you can install the latest version using Homebrew:
- Install Homebrew (if not already installed):
/bin/bash -c "$(curl -fsSL https://raw.githubusercontent.com/Homebrew/install/HEAD/install.sh)"
- Install Git:
brew install git
Verify the installation:
git --version
On Windows
- Download the Git installer from the official Git website.
- Run the installer and follow the prompts. Use the default settings unless you have specific preferences.
- Verify the installation by opening Git Bash and running:
git --version
3. Configuring Git
Setting Up Your Identity
After installing Git, configure your username and email address. This information will be included in your commits:
git config --global user.name "Your Name"
git config --global user.email "[email protected]"
Configuring Default Text Editor
Set your preferred text editor for Git commit messages:
- Linux/macOS:
git config --global core.editor "nano"
- Windows:
git config --global core.editor "notepad"
Setting Up Line Ending Preferences
To avoid line-ending issues between different operating systems, configure Git to handle line endings automatically:
- Linux/macOS:
git config --global core.autocrlf input
- Windows:
git config --global core.autocrlf true
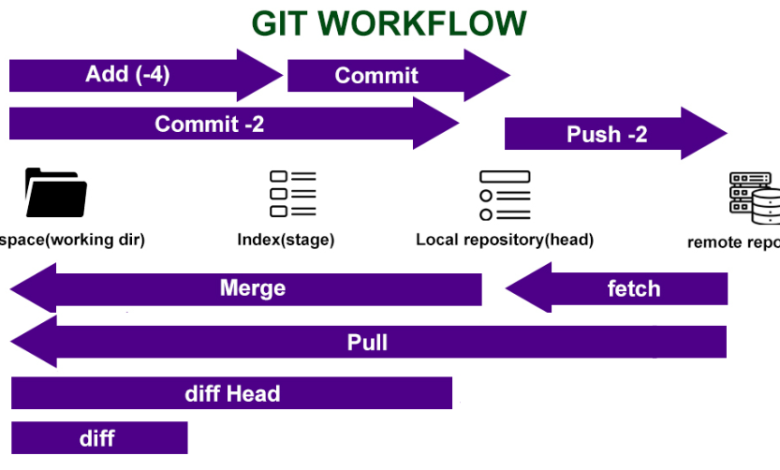
4. Basic Git Workflow
Initializing a Repository
To start using Git in a project, initialize a new repository:
git init
This creates a .git directory in your project, which stores all the version control data.
Tracking Changes
To track changes to a file, add it to the staging area:
git add filename
To stage all changes in the directory:
git add .
Committing Changes
Commit the staged changes with a descriptive message:
git commit -m "Your commit message"
Viewing the Commit History
To view the commit history:
git log
For a more concise view:
git log --oneline
5. Working with Remote Repositories
Cloning a Repository
To clone an existing repository from a remote server (e.g., GitHub):
git clone https://github.com/username/repository.git
Adding a Remote Repository
To add a remote repository to your local Git project:
git remote add origin https://github.com/username/repository.git
Pushing and Pulling Changes
- Push changes to the remote repository:
git push origin mainReplace
mainwith the name of your default branch if it’s different. - Pull changes from the remote repository:
git pull origin main
6. Branching and Merging
Creating and Switching Branches
- Create a new branch:
git branch new-feature - Switch to the new branch:
git checkout new-featureOr, in newer versions of Git:
git switch new-feature
Merging Branches
To merge a branch into the current branch:
git merge new-feature
Resolving Merge Conflicts
If Git encounters conflicts during a merge, it will prompt you to resolve them. Open the conflicting files, make the necessary changes, and then mark them as resolved:
git add filename
git commit
7. Advanced Git Features
Stashing Changes
To temporarily save changes without committing them:
git stash
To reapply the stashed changes:
git stash pop
Tagging Releases
To create a tag for a specific release:
git tag v1.0.0
To push tags to the remote repository:
git push origin --tags
Using Git Hooks
Git hooks are scripts that run automatically when certain events occur (e.g., before a commit). To use hooks, place executable scripts in the .git/hooks directory of your repository.
8. Best Practices for Using Git
- Write Clear Commit Messages: Use descriptive commit messages to explain the purpose of each change.
- Commit Often: Make small, frequent commits to track changes more effectively.
- Use Branches: Create separate branches for features, bug fixes, and experiments.
- Review Changes Before Committing: Use
git diffto review changes before staging them. - Sync with Remote Repositories Regularly: Pull changes from the remote repository frequently to avoid conflicts.
9. Conclusion
Git is an indispensable tool for version control and collaboration in software development. By following this guide, you can install Git, configure it for your workflow, and use its powerful features to manage your projects effectively. Whether you’re a beginner or an experienced developer, mastering Git will enhance your productivity and help you build better software.
Happy coding!