The find command is one of the most powerful and versatile tools available in Unix-like operating systems, such as Linux and macOS. It allows users to search for files and directories based on a wide range of criteria, including name, size, type, modification time, and more. One of the most common use cases for the find command is to locate and remove files that match specific conditions. This article will provide a detailed guide on how to use the find command to remove files, covering all the technical details you need to know.
Table of Contents
- Introduction to the
findCommand - Basic Syntax of the
findCommand - Using
findto Locate Files - Combining
findwith-execto Remove Files - Using
-deleteOption to Remove Files - Handling File Names with Special Characters
- Removing Files Based on Specific Criteria
- By File Name
- By File Size
- By File Type
- By Modification Time
- Safety Precautions When Removing Files
- Advanced Usage: Combining Multiple Conditions
- Conclusion
1. Introduction to the find Command
The find command is a command-line utility that recursively searches through directories to find files and directories that match specified conditions. It is highly flexible and can be combined with other commands to perform actions on the files it finds, such as deleting them, moving them, or changing their permissions.
2. Basic Syntax of the find Command
The basic syntax of the find command is as follows:
find [path] [expression]
path: The directory where the search begins. If no path is specified,findstarts searching from the current directory (.).expression: The criteria used to match files and directories. This can include options like-name,-type,-size,-mtime, and more.
3. Using find to Locate Files
Before removing files, it’s often useful to first locate them to ensure that you’re targeting the correct files. For example, to find all .txt files in the current directory and its subdirectories, you can use:
find . -name "*.txt"
This command will list all files with the .txt extension starting from the current directory (.).
4. Combining find with -exec to Remove Files
Once you’ve located the files you want to remove, you can use the -exec option to execute a command on each file that find matches. The most common command to use with -exec is rm, which removes files.
For example, to remove all .txt files in the current directory and its subdirectories, you can use:
find . -name "*.txt" -exec rm {} \;
-exec: This option allows you to execute a command on each file thatfindmatches.rm {}: Thermcommand is used to remove files. The{}is a placeholder thatfindreplaces with the current file name.\;: This indicates the end of the-execcommand. The backslash (\) is used to escape the semicolon (;), which is necessary to terminate the command.
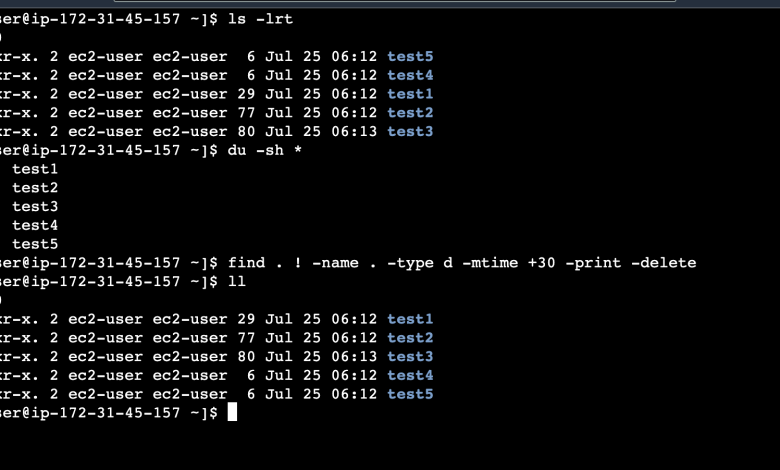
5. Using -delete Option to Remove Files
In addition to using -exec with rm, the find command also provides a -delete option that can be used to remove files directly. This option is more efficient than using -exec rm {} \; because it doesn’t need to spawn a new process for each file.
For example, to delete all .txt files in the current directory and its subdirectories, you can use:
find . -name "*.txt" -delete
Note: The -delete option is not available on all versions of find. If your system doesn’t support it, you should use the -exec option instead.
6. Handling File Names with Special Characters
File names that contain special characters (such as spaces, newlines, or quotes) can cause issues when using the find command. To handle such files safely, you can use the -print0 option with find and the -0 option with xargs.
For example, to remove all .txt files, including those with special characters in their names, you can use:
find . -name "*.txt" -print0 | xargs -0 rm
-print0: This option tellsfindto print the file names followed by a null character (\0) instead of a newline. This is useful for handling file names with special characters.xargs -0: The-0option tellsxargsto expect null-terminated input, which matches the output offind -print0.
7. Removing Files Based on Specific Criteria
The find command allows you to remove files based on various criteria. Below are some common examples:
By File Name
To remove files with a specific name pattern, use the -name option. For example, to remove all files named temp.txt:
find . -name "temp.txt" -delete
By File Size
To remove files based on their size, use the -size option. For example, to remove all files larger than 100MB:
find . -size +100M -delete
+100M: This matches files larger than 100MB. You can also use-100Mto match files smaller than 100MB, or100Mto match files exactly 100MB in size.
By File Type
To remove files of a specific type, use the -type option. For example, to remove all directories named temp:
find . -type d -name "temp" -delete
-type d: This matches directories. You can also use-type ffor regular files,-type lfor symbolic links, and so on.
By Modification Time
To remove files based on their modification time, use the -mtime option. For example, to remove all files modified more than 7 days ago:
find . -mtime +7 -delete
+7: This matches files modified more than 7 days ago. You can also use-7to match files modified within the last 7 days.
8. Safety Precautions When Removing Files
Removing files with the find command can be dangerous if not done carefully, as it can permanently delete files without any confirmation. Here are some safety precautions to consider:
- Test with
-printFirst: Before using-deleteor-exec rm, use the-printoption to list the files that would be deleted. For example:find . -name "*.txt" -print
- Use Interactive Deletion: If you want to confirm each deletion, you can use the
-okoption instead of-exec. For example:find . -name "*.txt" -ok rm {} \;
This will prompt you for confirmation before deleting each file.
- Backup Important Files: Always make sure to back up important files before performing bulk deletions.
9. Advanced Usage: Combining Multiple Conditions
The find command allows you to combine multiple conditions using logical operators such as -and, -or, and -not. For example, to remove all .txt files larger than 100MB that were modified more than 30 days ago, you can use:
find . -name "*.txt" -size +100M -mtime +30 -delete
You can also use parentheses to group conditions. For example, to remove all .txt files that are either larger than 100MB or older than 30 days:
find . -name "*.txt" \( -size +100M -o -mtime +30 \) -delete
\( ... \): The parentheses are used to group conditions. The backslashes (\) are used to escape the parentheses so that they are interpreted correctly by the shell.
10. Conclusion
The find command is an incredibly powerful tool for locating and removing files based on a wide range of criteria. By mastering its syntax and options, you can efficiently manage your files and directories, even in complex scenarios. However, it’s important to use the find command with caution, especially when removing files, as it can permanently delete data. Always test your commands with -print or -ok before executing them, and make sure to back up important files.
With the knowledge gained from this guide, you should be well-equipped to use the find command to remove files in a variety of situations, from simple to advanced. Happy file hunting!