How to Install and Use Jenkins for CI/CD Pipelines on Ubuntu

How to Install and Use Jenkins for CI/CD Pipelines on Ubuntu
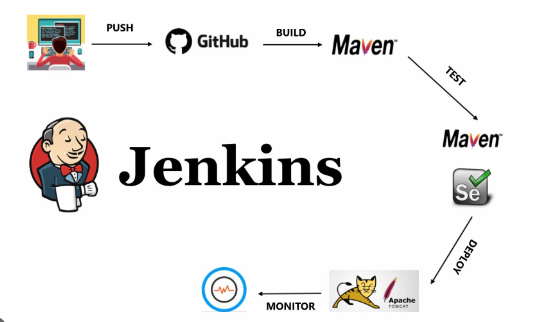
Jenkins is a widely-used, open-source automation server designed for building, testing, and deploying applications through Continuous Integration and Continuous Delivery (CI/CD) pipelines. With Jenkins, development teams can automate many stages of software development, making it a powerful tool for DevOps practices. In this guide, we’ll walk through the process of installing Jenkins on Ubuntu and creating your first CI/CD pipeline.
Prerequisites
Before we begin, ensure that your system meets the following requirements:
- Ubuntu Server: This guide is based on Ubuntu 20.04 LTS or later.
- Java: Jenkins requires Java to run. We recommend using OpenJDK 11 or later.
- Root Access: You need sudo privileges to install and configure Jenkins.
Step 1: Install Java
Jenkins is a Java-based application, so the first step is to install Java. Open your terminal and execute the following commands:
sudo apt update
sudo apt install openjdk-11-jdk -y
Once the installation is complete, verify it by checking the Java version:
java -version
You should see something similar to:
- openjdk version “11.0.11” 2021-04-20
- OpenJDK Runtime Environment (build 11.0.11+9-Ubuntu-0ubuntu2)
- OpenJDK 64-Bit Server VM (build 11.0.11+9-Ubuntu-0ubuntu2, mixed mode, sharing)
Step 2: Add the Jenkins Repository
Jenkins is not available in Ubuntu’s default repositories, so you need to add the official Jenkins repository to your system.
First, add the Jenkins GPG key:
wget -q -O – https://pkg.jenkins.io/debian/jenkins.io.key | sudo apt-key add –
Add the Jenkins repository to the package source list:
sudo sh -c ‘echo deb http://pkg.jenkins.io/debian-stable binary/ > /etc/apt/sources.list.d/jenkins.list’
Update the package index:
sudo apt update
Step 3: Install Jenkins
Now that the repository has been added, install Jenkins using the following command:
sudo apt install jenkins -y
After installation, Jenkins will start automatically. You can check the status of Jenkins by running:
sudo systemctl status jenkins
If the service is running, you should see an output similar to:
- jenkins.service – LSB: Start Jenkins at boot time
- Loaded: loaded (/etc/init.d/jenkins; generated)
- Active: active (exited) since …
To ensure Jenkins starts on boot, run the following command:
sudo systemctl enable jenkins
Step 4: Configure Firewall
By default, Jenkins runs on port 8080. To ensure you can access it, you’ll need to allow traffic on this port. If you have UFW (Uncomplicated Firewall) enabled, use the following command to open port 8080:
sudo ufw allow 8080
sudo ufw reload
To verify that the firewall rule was added, run:
sudo ufw status
Step 5: Set Up Jenkins
With Jenkins installed and the firewall configured, you can now access the Jenkins web interface.
Open your browser and navigate to http://:8080. You should see a Jenkins Unlock screen.
To unlock Jenkins, you need the initial admin password. Find it using the following command:
sudo cat /var/lib/jenkins/secrets/initialAdminPassword
Copy the password and paste it into the Jenkins unlock screen.
Follow the on-screen instructions to complete the setup. Jenkins will prompt you to install suggested plugins. Select Install Suggested Plugins to get started with the most common tools.
After the plugins are installed, you will be asked to create an admin user. Set up your admin account and complete the setup.
Step 6: Create Your First Jenkins Pipeline
Jenkins provides a simple and effective way to create pipelines through its web interface. Here’s how to set up a basic CI/CD pipeline.
Create a New Pipeline
Log in to the Jenkins dashboard using the admin credentials you created during setup.
Click on “New Item” in the Jenkins dashboard to create a new project.
Give your project a name, select Pipeline, and click OK.
Define Your Pipeline
Once inside the project, scroll down to the Pipeline section.
You can define the pipeline script manually or pull it from a version control system (like Git). For this example, we’ll write a simple pipeline script.
In the Pipeline script field, enter the following code:
pipeline {
agent anystages {
stage(‘Build’) {
steps {
echo ‘Building…’
}
}
stage(‘Test’) {
steps {
echo ‘Testing…’
}
}
stage(‘Deploy’) {
steps {
echo ‘Deploying…’
}
}
}
}
This script defines a basic pipeline with three stages: Build, Test, and Deploy.
Click Save.
Running the Pipeline
After saving your pipeline, go to the project page and click “Build Now”. Jenkins will execute the defined stages in sequence, and you will see the output in the console log.
You can monitor the pipeline execution in real time by clicking on “Build History” and then “Console Output”.
Step 7: Automating Pipelines with Source Control
To make Jenkins automatically trigger a pipeline when changes are pushed to a Git repository, follow these steps:
- In the project configuration, under the Pipeline section, select Pipeline script from SCM.
- Choose Git as the SCM, and provide the repository URL.
- Configure a webhook in your Git repository (GitHub, GitLab, etc.) to trigger Jenkins when new commits are pushed.
- This will enable continuous integration, where the pipeline is triggered automatically for every commit.
official Jenkins documentation.
If you’re looking to enhance your skills in servers, Linux systems, and OpenLDAP, feel free to visit our website using the link below. You can rent a server and run your tests in a reliable environment. Best of luck! 🙂
How to Set Up OpenLDAP Server on Ubuntu
“If you want to sharpen your skills in servers and Linux systems, check out our website through the link below. You can rent a server and conduct your tests in a secure environment. Good luck! :)”


